3. OpenCV의 기본 자료 구조 및 실습[1]
OpenCV 설치 후 제대로 설치되었는지 아래 코드를 통해 확인
#include <opencv2/highgui.hpp>

void main() {
// Scalar(num)에 있는 num: Color(0~255)
cv::Mat image(300, 400, CV_8UC1, cv::Scalar(255));
cv::imshow("영상보기", image);
cv::waitKey(0);
}
위의 사진처럼 나오면 ok
3.1. Point_ 클래스
- 가로와 세로 위치를 2차원 좌표로 나타내기 위한 템플릿 클래스
- 자료형 간결 표현 제공 - Point2와 문자 ‘i’, ‘f’, ‘d’ 문자 조합
  #include <opencv2/opencv.hpp>
  using namespace std;

  int main() {
    // Point_ 객체 선언 방식
    cv::Point_<int> pt1(100, 200);
    cv::Point_<float> pt2(92.3f, 125.23f);
    cv::Point_<double> pt3(100.2, 300.9);

    // Point_ 객체 간결 선언 방식
    cv::Point2i pt4(120, 69);
    cv::Point2f pt5(0.3f, 0.f), pt6(0.f, 0.4f);
    cv::Point2d pt7(0.25, 0.6);

    // Point_ 객체 연산
    cv::Point	pt8 = pt1 + (cv::Point2i)pt2; // 자료형이 다른 Point 객체 덧셈
    cv::Point2f pt9 = pt6 * 3.14f;
    cv::Point2d pt10 = (pt3 + (cv::Point2d)pt6) * 10;

    cout << "pt8 = " << pt8.x << ", " << pt8.y << endl;
    cout << "[pt9] = " << pt9 << endl;
    cout << (pt2 == pt6) << endl;
    cout << "pt7 : " << pt7 << endl;
    cout << "pt8 : " << pt8 << endl;
    cout << "pt7과 pt8의 내적 : " << (double)pt7.dot(pt8) << endl;

  }
3.2. Point3_ 클래스
- 3차원 자료를 나타내기 위한 자료형
- 간결 표현 방식 지원 - Point3와 ‘i’, ‘f’, ‘d’ 문자 조합
#include <opencv2/opencv.hpp>
using namespace cv;
using namespace std;

int  main()
{
// Point3_은 3차원 자료를 나타내기 위한 자료형
// 객체 기본 및 간결 선언 방식
Point3_<int> pt1(100, 200, 300);
Point3_<float> pt2(92.3f, 125.23f, 250.f);
Point3f  pt3(0.3f, 0.f, 15.7f);
Point3d  pt4(0.25, 0.6, 33.3);

// 객체 간결 선언 및 객체 연산
Point3i  pt5 = pt1 - (Point3_<int>)pt2;
Point3f  pt6 = pt2 * 3.14f;
Point3d  pt7 = ((Point3d)pt3 + pt4) * 10.f;

cout << "두 벡터(pt4, pt7)의 내적  " << pt4.dot(pt7) << endl;
cout << "pt5 = " << pt5.x << ", " << pt5.y << ", " << pt5.z << endl;
cout << "[pt6] = " << pt6 << endl;
cout << "[pt7] = " << pt7 << endl;
return 0;
}
3.3. Size_ 클래스
- 이미지나 사각형의 크기를 규정하는 템플릿 클래스
- 멤버변수 width, height
#include <opencv2/opencv.hpp>
using namespace cv;
using namespace std;
int  main()
{
// Size_ 객체 기본 선언 방식
Size_<int> sz1(100, 200);
Size_<float> sz2(192.3f, 25.3f);
Size_<double> sz3(100.2, 30.9);

// Size 객체 간결 선언 방식
Size   sz4(120, 69);
Size2f  sz5(0.3f, 0.f);
Size2d  sz6(0.25, 0.6);

Point2d  pt1(0.25, 0.6);
Size2i   sz7 = sz1 + (Size2i)sz2;
Size2d   sz8 = sz3 - (Size2d)sz4;
Size2d   sz9 = sz5 + (Size2f)pt1;

cout << "sz1.width = " << sz1.width;
cout << ",  sz1.height = " << sz1.height << endl;
cout << "sz1 넓이 " << sz1.area() << endl;
cout << "[sz7] = " << sz7 << endl;
cout << "[sz8] = " << sz8 << endl;
cout << "[sz9] = " << sz9 << endl;
return 0;
}
3.4. Rect_ 클래스
- 2차원의 사각형 정보를 나타내기 위한 템플릿 클래스
#include <opencv2/opencv.hpp>
using namespace cv;
using namespace std;
int main()
{
Size2d  sz(100.5, 60.6);					 // 사각형 크기
Point2f  pt1(20.f, 30.f), pt2(100.f, 200.f); // 시작 좌표 및 종료 좌표

// Rect_ 객체 기본 선언 방식
Rect_<int>    rect1(10, 10, 30, 50);		 // 시작 좌표(10, 10)에서 너비와 높이 (30, 50)인 사각형 선언
Rect_<float>   rect2(pt1, pt2);				 // 시작 좌표와 종료 좌표로 선언
Rect_<double> rect3(Point2d(20.5, 10), sz);	 // 시작 좌표와 Size_ 객체로 선언(가장 좋은 방법)

// 간결 선언 방식 & 연산 적용
Rect   rect4 = rect1 + (Point)pt1;        // 시작 좌표 변경 --> 평행이동
Rect2f rect5 = rect2 + (Size2f)sz;        // 사각형 덧셈 --> 크기 변경
Rect2d rect6 = rect1 & (Rect)rect2;       // 두 사각형의 교차영역
Rect   rect7 = rect1 | (Rect)rect2; // 두 사각형의 영역을 모두 포함하는 영역

// 결과 출력
cout << "rect3 = " << rect3.x << "," << rect3.y << ", ";
cout << rect3.width << "x" << rect3.height << endl;
cout << "rect4 = " << rect4.tl() << "  " << rect4.br() << endl;
cout << "rect5 크기 = " << rect5.size() << endl;
cout << "[rect6] = " << rect6 << endl;

cout << "rec1 = " << rect1 << endl;
cout << "rec2 = " << rect2 << endl;
cout << "rec7 = " << rect7 << endl;

return 0;
}
3.5. Vec 클래스
- 원소 개수가 작은 숫자 벡터를 위한 템플릿 클래스
-
Vec<TP, 2> ==> Point_ 클래스로 형변환 가능
Vec<TP, 3> ==> Point3_ 클래스로 형변환 가능
Vec<TP, 4> ==> Scalar_ 클래스로 형변환 가능 - 배열첨자([]) 사용하여 벡터 원소 접근
- 간결 선언 지원 - Vec와 숫자 및 ‘b’, ‘i’, ‘f’, ‘d’의 문자 조합
#include <opencv2/opencv.hpp>
using namespace cv;
using namespace std;
int  main()
{
// 기본 선언 및 간렬 방식
Vec <int, 2> v1(5, 12);
Vec <double, 3> v2(40, 130.7, 125.6);
Vec2b  v3(10, 10);
Vec6f  v4(40.f, 230.25f, 525.6f);
Vec3i  v5(200, 230, 250);

// 객체 연산 및 형변환
Vec3d v6 = v2 + (Vec3d)v5;
Vec2b v7 = (Vec2b)v1 + v3;
Vec6f v8 = v4 * 20.0f;

Point  pt1 = v1 + (Vec2i)v7;
Point3_<int> pt2 = (Vec3i)v2;

Vec3f v42(40.f, 230.25f, 525.6f);
Vec3i v52(200, 230, 250);
Vec3f v9 = v42.mul((Vec3f)v52);
Vec3i v10 = (Vec3i)v42.mul(v52);

// 콘솔창 출력
cout << "[v2] =  " << v2 << endl;
cout << "[v3] =  " << v3 << endl;
cout << "[v7] =  " << v7 << endl;
cout << "[v3 * v7] =  " << v3.mul(v7) << endl;
cout << "v8[0] =  " << v8[0] << endl;
cout << "v8[1] =  " << v8[1] << endl;
cout << "v8[2] =  " << v8[2] << endl;
cout << "[pt1] =  " << pt1 << endl;
cout << "[pt2] =  " << pt2 << endl;

// v8 벡터는 6차원이지만, 실지로 계산했을 때 v4는 3개만 가지고 있기 때문에 나머지는 0
cout << "v8[3] = " << v8[3] << endl;
cout << "v8[4] = " << v8[4] << endl;
cout << "v8[5] = " << v8[5] << endl;

cout << endl;
cout << "v9 = " << v9 << endl;
cout << "v10 = " << v10 << endl;

return 0;
}
3.6. Scalar_ 클래스
- Vec 클래스 중에서 Vec<Tp, 4>에서 파생된 템플릿 클래스
- 특별히 화소의 값을 정하기 위한 자료형으로 정의(RGBA)
#include <opencv2/opencv.hpp>
using namespace cv;
using namespace std;

int main() {
// 기본 선언 방법
Scalar_<uchar>	red(0, 0, 255);
Scalar_<int>	blue(255, 0, 0);
Scalar_<double>	color1(500); // Red, Green, Blue, Alpha
Scalar_<float>	color2(100.f, 200.f, 125.9f);

cout << "red	= " << red << endl;
cout << "blue	= " << blue << endl;
cout << "color1 = " << color1 << endl;
cout << "color2 = " << color2 << endl;

Vec3d	green(0, 0, 300.5);
Scalar	green1 = color1 + (Scalar)green;
Scalar	green2 = color2 + (Scalar_<float>)green;

cout << "green	= " << green << endl;
cout << "green1	= " << green1 << endl;
cout << "green2 = " << green2 << endl;

}
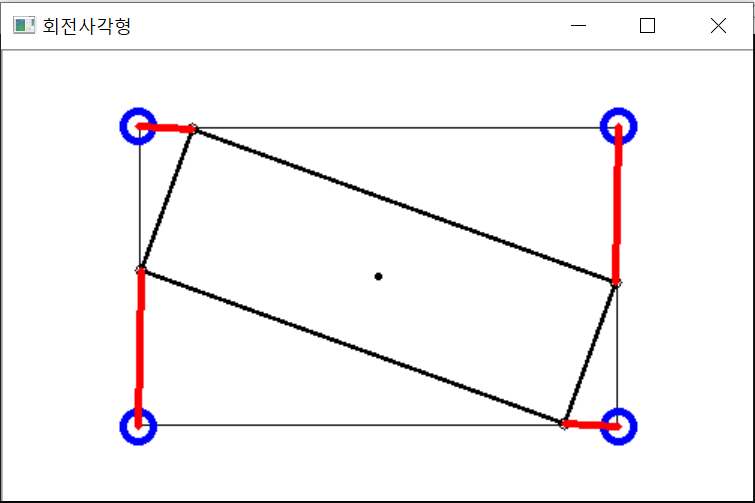
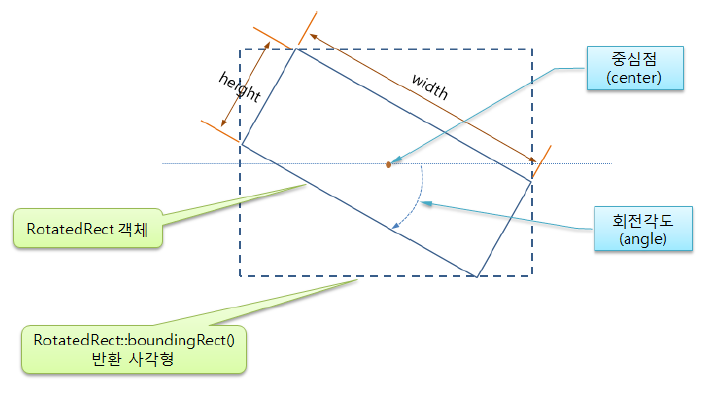
3.7. RotatedRect 클래스
- 회전된 사각형을 나타내기 위한 클래스
- RotatedRect(const Point2f& center, const Size2f& size, float angle)
- Poin2f& center: 회전의 중심점
- Size2f& size: 사각형의 크기(가로, 세로)
- float angle: 회전각도(시계방향 회전, 3시 방향이 0도)
- boundingRect(): 회전사각형의 4개 모서리를 모두 포함하는 최소 크기의 사각형 영역을 반환
- circle(Mat& img, Point center, int radius, const Scalar& color, int thickness=1, int lineType=8, int shift=0)
#include <opencv2/opencv.hpp>
using namespace cv;
using namespace std;

int main() {
	Mat		image(300, 500, CV_8UC3, Scalar(255, 255, 255));
	Point2f		center(250, 150), pts[4];
	Size2f		size(300, 100);
	RotatedRect	rot_rect(center, size, 20);	 // 회전사각형 선언

	Rect bound_rect = rot_rect.boundingRect();
	rectangle(image, bound_rect, Scalar(0), 1);	 // 사각형 그리기
	circle(image, rot_rect.center, 1, Scalar(0), 2); // 원 그리기


	rot_rect.points(pts); // 회전사각형의 꼭짓점 반환
	for (int i = 0; i < 4; i++) {
		circle(image, pts[i], 4, Scalar(0), 1);
		line(image, pts[i], pts[(i + 1) % 4], Scalar(0), 2);
	}

	Point2f		center2(bound_rect.x, bound_rect.y), pts2[4];
	Size2f		size2(bound_rect.width, bound_rect.height);
	RotatedRect	rot_rect2(center, size2, 0);
	rot_rect2.points(pts2);
	for (int j = 0; j < 4; j++) {
		circle(image, pts2[j], 10, Scalar(255, 0, 0), 3);
//		Point2f pts3 = pts2[j] - pts[j];
		cout << pts2[j] << endl;
		line(image, pts2[j], pts[j % 4], Scalar(0, 0, 255), 3);
	}

	imshow("회전사각형", image);
	waitKey(0);
	return 0;
}